
Septic Tank Filter Location: Find and Access It Safely
Discover the septic tank filter location with our step-by-step guide. Find it safely and learn when to call a pro for help.

Your septic tank’s effluent filter sits on the outlet side of the tank, inside the outlet baffle housing. On a two-compartment tank, that means the second manhole cover, the one farthest from your house. Open that lid and you’ll find the filter housing directly below it.
Before you grab a shovel or pry bar, two things matter:
- Where to look: Outlet baffle, second manhole, farthest from the house. On a single-compartment tank, look for the lid on the side where the pipe exits toward the drain field.
- Safety rule: Never enter the tank. OSHA classifies septic tanks as permit-required confined spaces — the gases inside can be fatal within seconds. All filter work happens from the surface.
- When to call a pro: If the lid is buried more than a foot deep, the liquid level is above the outlet pipe when you open it, or you can’t see the filter housing clearly, stop and call a licensed septic contractor.
Pro Tip: Check your most recent pump-out receipt or septic permit. Both often include a hand-drawn diagram showing exactly which lid covers the outlet and whether a filter is installed.
Table of Contents
- What an effluent filter does and why it matters
- Exactly where the filter sits on different tank types
- How to find your tank lids and pick the right one
- How to open lids and access the filter safely
- Step-by-step: how to inspect and clean a surface-accessible filter
- Signs your filter is clogged and what to do right now
- How often to clean the filter and what it costs
- Can older tanks be retrofitted with a filter?
- When to hire a septic professional and what they’ll do
- Key Takeaways
- What I’ve learned finding filters on real tanks
- Useful sources and local contacts
What an effluent filter does and why it matters
An effluent filter, sometimes called a septic filter or outlet screen, is a slotted or mesh cartridge installed at the tank’s outlet baffle. Its job is simple: catch suspended solids before they leave the tank and reach the drain field.
“Effluent screens and filters are installed at the outlet of the septic tank to prevent solids from entering the soil absorption system. A clean filter is the last line of defense against premature drain-field failure.”
— U.S. Environmental Protection Agency, Effluent Screens and Filters
The drain field is the most expensive component of a septic system to replace, often running into thousands of dollars. A $10–$20 annual filter cleaning is the cheapest insurance you can buy against that outcome. Filters are installed on the outlet side only. Placing one on the inlet side causes immediate backups into the house, which is why the EPA explicitly warns against inlet-side placement.
Most residential filters are cylindrical cartridges that slide straight up out of their housing. Graywater filters and washing-machine lint filters are a different category and are installed upstream, before the tank, not at the outlet.
Exactly where the filter sits on different tank types
The outlet baffle is the constant. What changes is how you reach it.
Two-compartment concrete tanks
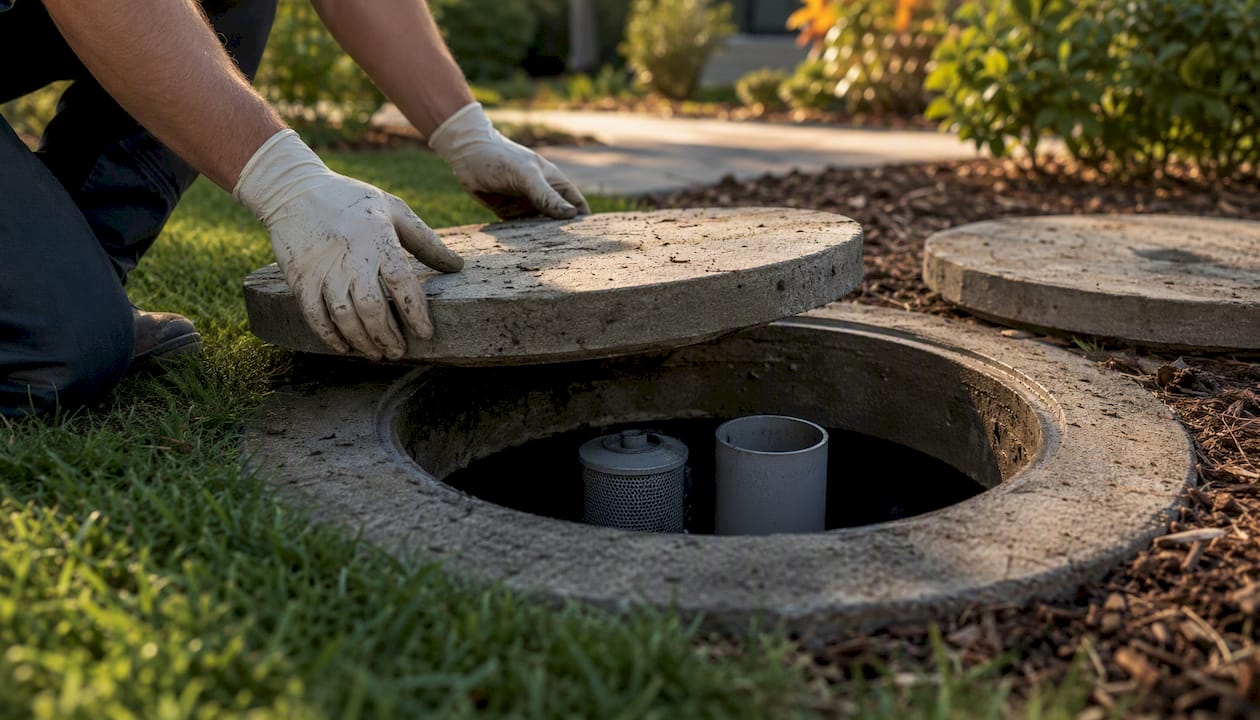
This is the most common residential setup in the U.S. The tank has two lids: one over the inlet compartment (closer to the house) and one over the outlet compartment (farther from the house). The filter is under that second lid, seated in a vertical housing attached to the outlet baffle. Most concrete lids are typical residential size and can be quite heavy.
Single-compartment tanks
Less common in newer construction but still widespread in older homes. There’s one large lid, and the filter housing is on the outlet end, the side where the pipe exits toward the drain field. Look for the pipe direction to orient yourself.
Plastic and fiberglass tanks
These tanks often use integral compartments with vertical filter housings accessible through risers, plastic extensions that bring the access point up to or above ground level. Tank material directly affects how and where the filter is mounted: plastic tanks more frequently use riser-accessed vertical housings, while concrete tanks rely on heavy removable lids.
Retrofitted and external placements
Some older tanks retrofitted according to mid-2000s code changes may have filters installed in external locations such as vaults or inline housings between the tank and drain field. If you open the outlet lid and don’t see a filter housing, it may be in one of these external locations.
Common filter housing locations by tank type:
| Tank Type | Filter Access Point | Typical Lid Type |
|---|---|---|
| Two-compartment concrete | Second manhole, outlet end | Heavy concrete lid |
| Single-compartment concrete | Outlet-end lid | Concrete lid |
| Plastic/fiberglass | Riser above outlet compartment | Lightweight plastic cap |
| Retrofitted older tank | External vault or distribution box | Varies |
| Two-tank system | Second tank, outlet side | Matches tank material |
What to look for when you open the lid: a vertical plastic or PVC housing, usually white or gray, extending down from the outlet baffle. The filter cartridge handle or cap will be visible at the top of that housing.
How to find your tank lids and pick the right one
Finding the tank itself is step one. Identifying the correct lid is step two.
Locating the tank:
Start at the point where your main sewer line exits the house foundation, typically a 4-inch pipe on the basement or crawl space wall. The tank is usually located a short distance from the house in the direction that pipe points. Walk that line and look for:
- A slightly raised or sunken rectangular area in the yard
- Grass that’s noticeably greener or lusher over the tank (from nutrient-rich effluent)
- Two low mounds or concrete rings visible at the surface
- A previous pump-out access hole that was filled in
Your county health department or local permitting office holds the original septic permit, which includes a site plan showing the tank’s location and orientation. This is the fastest shortcut, especially on older properties where the tank has been buried under years of landscaping.
Identifying the outlet lid:
Once you’ve found the tank, orient yourself. The inlet lid is closer to the house; the outlet lid is farther away. On a two-compartment tank, the outlet lid is the second one. If you’re unsure, open the lid carefully and look inside: the outlet pipe will have the filter housing below it, and the pipe itself exits toward the drain field side of the yard.
Locating septic tank lids can be tricky on older properties where lids are often buried below grade. A metal probe rod or a long screwdriver can help you feel for the concrete edges without digging blindly.
What to have on hand before you open anything:
- Flashlight or headlamp
- Flatbar or lid hook for heavy concrete lids
- Tape measure (to note depth for future reference)
- Waterproof gloves
- A second person nearby
Pro Tip: Your septic permit or the most recent pump-out report often notes whether a filter is installed and which lid it’s under. Call your county health department if you can’t find your paperwork — they can pull the permit record in minutes.
How to open lids and access the filter safely
Surface access is safe. Entering the tank is not.
“Septic tanks are permit-required confined spaces. Toxic gases including hydrogen sulfide can accumulate to lethal concentrations. All filter cleaning and maintenance must be performed from outside the tank.”
— OSHA, Confined Space Safety for Septic Work
Keep children and pets away from the work area before you lift any lid. Set the lid aside on flat ground where it won’t roll or fall back into the opening.
PPE for surface-level filter work:
- Nitrile or rubber gloves: septic effluent carries pathogens; bare hands are not an option.
- Safety glasses: splashing during filter removal is common.
- N95 or P100 respirator: hydrogen sulfide and methane are present even at the surface opening.
- Long sleeves and old clothes: assume anything near the opening will get contaminated.
- Closed-toe shoes: concrete lids are heavy and drop without warning.
Risers and accessibility: If your tank has plastic risers extending to grade, you’re in the best-case scenario. The filter housing is right there, the lid is lightweight, and the whole job takes 20–30 minutes. Without risers, you’re lifting a 50–100-pound concrete lid and working at arm’s length into a deeper opening, which is harder and riskier.
If the filter is attached to internal baffle plumbing, tucked between compartments, or not visible from the surface opening, do not dismantle any tank plumbing. That’s the point where you close the lid and call a licensed septic professional.
Step-by-step: how to inspect and clean a surface-accessible filter
This procedure applies only when the filter housing is visible from the surface and the liquid level is below the outlet pipe. If liquid is at or above the outlet pipe when you open the lid, close it and schedule a pump-out first.
Tools and prep:
- Waterproof gloves, safety glasses, respirator
- Garden hose with water source nearby
- 5-gallon bucket (to catch drips)
- Flashlight
- Flatbar or lid hook
Cleaning sequence:
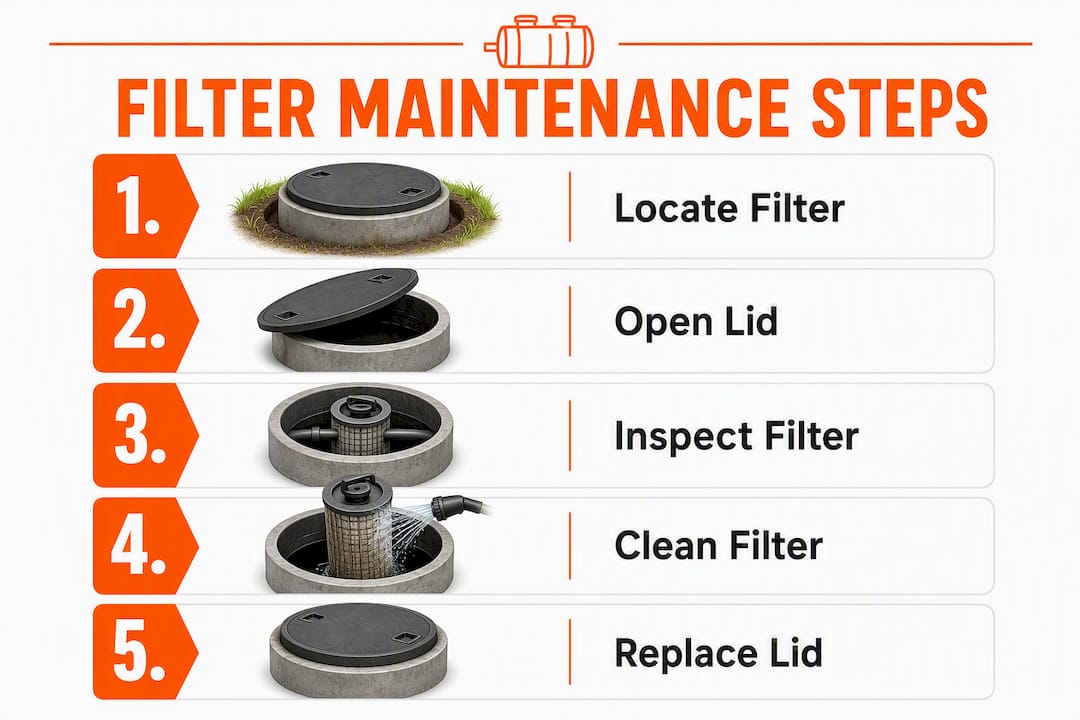
- Open the outlet lid using a flatbar or lid hook. Set it flat on the ground away from the opening.
- Check the liquid level. It should be below the outlet pipe. If it’s at or above the pipe, stop here and schedule a pump-out before proceeding.
- Grip the filter handle (usually a T-bar or loop at the top of the housing) and pull straight up. Do not twist or angle it — the cartridge slides vertically.
- Rinse the filter back into the tank. Hold the cartridge over the open tank and spray it down with a garden hose. Solids go back into the tank, not onto the ground. This is important: rinsing onto the ground creates a health hazard and may violate local health codes.
- Inspect the cartridge. Look for cracks in the housing, torn mesh, missing end caps, or heavy mineral buildup that won’t rinse off. A damaged filter needs replacement, not just cleaning.
- Reinstall the filter by sliding it straight back down into the housing until it seats fully.
- Replace and secure the lid. Make sure it’s fully seated and not tilted.
- Wash your hands and any exposed skin thoroughly with soap and water.
Inspection checkpoints:
- Cracks or fractures in the plastic housing
- Torn or collapsed mesh/slots
- Missing or damaged end seals
- Heavy grease or mineral scale that won’t rinse clear
- Any sign the housing itself is loose or cracked at the baffle connection
Pro Tip: If the filter is submerged when you open the lid, coordinate a pump-out first. Pumping the tank down before filter work lowers the liquid level, reduces spill risk, and gives you a clear view of the housing and baffle condition.
Signs your filter is clogged and what to do right now
A clogged filter backs up the entire system. Common symptoms include slow drains throughout the house, gurgling pipes, strong septic odors, and standing water near the tank. The key word is “throughout” — if only one drain is slow, the problem is likely a localized clog in that line. When every drain in the house runs slow at the same time, the filter is a prime suspect.
Symptom-by-symptom actions:
- Slow drains throughout the house: Reduce water use immediately. Avoid running the dishwasher, washing machine, or multiple fixtures at once. Schedule a filter inspection within the week.
- Gurgling pipes: Same as above. The gurgling means air is being displaced by rising liquid, which means the tank is backing up toward the house.
- Strong septic odors indoors or near the tank: Stop using water-intensive appliances. Odors inside the house can indicate the backup has reached the drain trap level.
- Standing water over the tank or drain field: This is an emergency. Stop all water use and call a septic professional the same day. Standing water over the drain field can indicate field failure, not just a clogged filter.
- Sewage backup into plumbing fixtures: Do not use any plumbing. Call a septic contractor immediately. This is the most urgent scenario and requires professional diagnosis before any DIY work.
Emergency vs. can-wait: A slow drain with no odors or backups can usually wait a few days for a scheduled service call. Any sewage backup, standing water over the field, or odors inside the house cannot wait. Those symptoms signal that the system is already failing to contain waste, and every flush makes it worse.
How often to clean the filter and what it costs
Most health agencies and septic professionals recommend inspecting the effluent filter at least once a year and cleaning it periodically depending on household size and usage. A household of four people will load the filter faster than a household of two.
Frequency and time estimates:
- Annual inspection: 20–30 minutes if the tank has risers; longer if lids are buried.
- Surface cleaning (DIY): 30–45 minutes including setup, rinsing, and cleanup. Minimal cost beyond your time.
- Professional pump-and-clean visit: 1–3 hours. The technician pumps the tank, cleans the filter, inspects baffles and pipes, and documents the service.
What affects the price of a professional visit:
- Whether the tank needs pumping (adds cost)
- Tank depth and accessibility (buried lids cost more to access)
- Filter replacement vs. cleaning only
- Travel distance and local market rates
- Whether repairs to baffles or pipes are needed
| Service Type | Frequency | Time Estimate | Typical Cost Range |
|---|---|---|---|
| DIY filter inspection and rinse | Annually | 30–45 min | Minimal (your time + water) |
| Professional filter cleaning only | Every 1–3 years | 30 min | $75 |
| Professional pump-out + filter clean | Every 3–5 years | 1–3 hours | $300 |
| Filter replacement (new cartridge) | As needed | 30 min | $50 parts + labor |
These ranges reflect typical U.S. residential service pricing and vary by region, tank size, and site conditions. North Carolina homeowners in Alamance County and the Piedmont Triad area can contact Jmseptic for a specific estimate.
Can older tanks be retrofitted with a filter?
Yes, most older concrete and plastic tanks can be retrofitted with an effluent filter, but the feasibility depends on the condition of the outlet baffle and whether the tank is accessible. Many jurisdictions began requiring filters on new septic installations after the mid-2000s, so tanks installed before that period often have none.
What to check before arranging a retrofit:
- Baffle condition: The outlet baffle must be intact to hold a filter housing. A deteriorated or missing baffle needs replacement first.
- Tank accessibility: If the tank is buried deep with no risers, the retrofit cost rises significantly.
- Local permit requirements: Some counties require a permit for filter retrofits; others treat it as routine maintenance. Call your county health department before scheduling work.
- Tank age and material: Very old tanks with cracked walls or failing seams may need full replacement rather than a retrofit.
Steps to arrange a retrofit:
- Hire a licensed septic contractor for an evaluation.
- Ask the contractor to pull or verify the permit status before work begins.
- Request a written scope and cost estimate before signing anything.
- Confirm whether the county requires an inspection after installation.
Pro Tip: When retrofitting, insist that the contractor installs an above-ground riser over the filter housing. Without a riser, every future cleaning requires digging up the lid, which adds cost and discourages regular maintenance. A riser pays for itself within two service visits.
For North Carolina homeowners considering a retrofit or new installation, the septic system installation guide for NC homeowners covers local permitting and design requirements in detail.
When to hire a septic professional and what they’ll do
Some filter situations are straightforward DIY. Others are not.
Call a pro when:
- The filter is not visible or reachable from the surface opening.
- The liquid level is at or above the outlet pipe when you open the lid.
- You see sewage backing up into the house.
- The filter housing or baffle appears cracked or damaged.
- You’re uncomfortable with any part of the access or removal process.
- The tank has never been pumped and you don’t know the filter’s condition.
What a professional service visit includes:
- Tank pump-down if liquid levels are high or the tank is due for pumping.
- Full filter removal, inspection, and cleaning or replacement.
- Baffle and pipe inspection (inlet and outlet).
- Check for signs of drain-field stress or failure.
- Written service report documenting findings, liquid levels, and any recommended repairs.
- Permit or documentation handling if required by the county.
Trust signals to look for when hiring:
- State-issued septic contractor license (required in North Carolina).
- Liability insurance and workers’ compensation coverage.
- Written estimate before work begins.
- References from local homeowners or verifiable online reviews.
- Post-service documentation you can keep for your records.
Routine filter maintenance is one of the highest-value services a septic contractor provides. The EPA notes that a clean filter is the last line of defense against drain-field failure, and drain-field replacement costs dwarf the price of a professional cleaning visit many times over.
Alamance County homeowners and those throughout the Piedmont Triad area can reach Jmseptic for septic maintenance and repair service covering filter cleaning, pump-outs, baffle repairs, and retrofits.

Key Takeaways
The septic effluent filter sits at the outlet baffle of your tank, under the second manhole on a two-compartment system, and should be inspected annually and cleaned every one to three years to protect the drain field.
| Point | Details |
|---|---|
| Filter location | Outlet baffle housing, under the second manhole cover on a two-compartment tank. |
| Safety rule | Never enter the tank; all filter work must be done from the surface. |
| Cleaning frequency | Inspect annually; clean every 1–3 years depending on household size and usage. |
| Top warning signs | Slow drains throughout the house, gurgling pipes, odors, or sewage backup. |
| When to call a pro | Inaccessible filter, liquid above the outlet pipe, visible damage, or any sewage backup. |
What I’ve learned finding filters on real tanks
Most homeowners assume the filter is right where the diagram shows it. Sometimes it is. Plenty of times, it isn’t.
The surprises come in a few flavors. Buried lids are the most common: a tank installed in the 1990s with no risers, covered by 14 inches of soil and a layer of sod, with no visible surface clue. The homeowner has no idea where the tank is, let alone which lid covers the filter. The second surprise is the retrofit that wasn’t done at the outlet baffle. Some older retrofits placed the filter in an external vault between the tank and the distribution box, which means opening the outlet lid and finding nothing, then having to trace the pipe line to find the actual housing.
For North Carolina homeowners specifically: pull your county health department permit record before you dig. Alamance County and the surrounding Piedmont Triad area have a mix of older systems from the 1970s and 1980s and newer installations that meet current filter requirements. The permit record tells you whether a filter was installed, where it sits, and whether a riser was added. That one document saves hours of guesswork.
If you find a buried lid with no riser, that’s the moment to call a contractor and ask about adding one. The cost of preventing septic failure is a fraction of what drain-field repair runs. A riser installation during a routine pump-out is the single most practical upgrade most older systems can get.
Useful sources and local contacts
Federal guidance:
- U.S. EPA — Effluent Screens and Filters: the primary federal reference on filter placement, function, and maintenance.
- OSHA — Confined Space Safety for Septic Work: covers the permit-required confined space classification and why tank entry is prohibited for homeowners.
State and county health department resources:
- Washington State Department of Health — Septic System Failure and Service: practical guidance on pump-down procedures and when professional service is required.
- Kenosha County — Septic Tank Effluent Filters: clear homeowner-facing explanation of filter symptoms and maintenance.
For North Carolina homeowners:
- For retrofit evaluations, pump-outs, filter cleaning, or emergency repairs in Alamance County and the Piedmont Triad area, contact Jmseptic directly.
This article provides general homeowner information, not professional engineering or legal advice. Septic system requirements vary by county and system type. Confirm current rules with your local health department or a licensed septic contractor before performing any work.